安装 Ubuntu
安装 Ubuntu live
https://www.cnblogs.com/mefj/p/14964416.html
Ubuntu live修改ip
在 Ubuntu 20.04 中,网络配置通常使用 Netplan 进行。以下是如何永久修改 IP 地址和网关的步骤。
- 首先,找到您的 Netplan 配置文件。大多数情况下,它位于 /etc/netplan/ 目录下。使用以下命令列出 /etc/netplan/ 目录中的文件:
ls /etc/netplan/您应该会看到一个 YAML 文件,如 01-netcfg.yaml 或 50-cloud-init.yaml。请记下文件名。
- 打开找到的 YAML 文件以编辑。使用以下命令(将 your-config-file.yaml 替换为您实际的文件名):
sudo nano /etc/netplan/your-config-file.yaml- 修改配置文件以设置静态 IP 地址和网关。以下是一个配置的例子:
network:
  version: 2
  ethernets:
    eth0:          # 请将 eth0 替换为您的网络接口名称
      dhcp4: no
      addresses: [192.168.1.100/24] # 设置您的静态 IP 地址和子网掩码
      gateway4: 192.168.1.1       # 设置您的网关
      nameservers:
        addresses: [8.8.8.8, 8.8.4.4] # 设置您的 DNS 服务器
请确保您的配置文件与此示例的语法一致。YAML 文件对缩进(通常是两个空格)非常敏感。
- 保存您的更改并退出文本编辑器。在 nano 中,按 Ctrl + X,然后按 Y,最后按 Enter。
- 应用更改并重新启动网络服务:
sudo netplan apply如果报错将配置文件这样改
network:
  version: 2
  ethernets:
    eth0:          # 请将 eth0 替换为您的网络接口名称
      dhcp4: no
      addresses: [192.168.1.100/24] # 设置您的静态 IP 地址和子网掩码
      routes:
        - to: 0.0.0.0/0
          via: 192.168.1.1 # 设置您的网关
      nameservers:
        addresses: [8.8.8.8, 8.8.4.4] # 设置您的 DNS 服务器
完成以上步骤后,您所做的 IP 地址和网关更改将被永久保存。如果您遇到任何问题,请检查您的配置文件以确保内容和格式正确。
修改root密码
sudo su
sudo passwd root
SSH配置
安装SSH
apt install openssh-server默认Ubuntu不允许root远程登录,后期如果想通过root登陆系统则必须修改SSH配置文件中的相关参数才行。
vim /etc/ssh/sshd_config

PermitRootLogin yes

# 重启sshd进程
systemctl restart sshd
更换阿里云源
# 备份
cp /etc/apt/sources.list /etc/apt/sources.list.backup

vim  /etc/apt/sources.list
相关信息
deb http://mirrors.aliyun.com/ubuntu/ focal main restricted deb http://mirrors.aliyun.com/ubuntu/ focal-updates main restricted deb http://mirrors.aliyun.com/ubuntu/ focal universe deb http://mirrors.aliyun.com/ubuntu/ focal-updates universe deb http://mirrors.aliyun.com/ubuntu/ focal multiverse deb http://mirrors.aliyun.com/ubuntu/ focal-updates multiverse deb http://mirrors.aliyun.com/ubuntu/ focal-backports main restricted universe multiverse deb http://mirrors.aliyun.com/ubuntu/ focal-security main restricted deb http://mirrors.aliyun.com/ubuntu/ focal-security universe deb http://mirrors.aliyun.com/ubuntu/ focal-security multiverse
保存下即可更新
apt update
apt upgrade
添加硬盘
将一个新硬盘挂载到 /data 目录并且使 /data 目录下的所有内容存储在新硬盘上
- 查看新硬盘:首先,使用
lsblk命令查看新硬盘的信息。这将显示系统中所有的块设备(包括硬盘)。
注意新硬盘的设备名称,它通常是类似 /dev/sdb 或 /dev/sdc 的形式
- 格式化新硬盘:在你可以使用新硬盘之前,你需要对其进行格式化。选择一个文件系统,如 ext4,并使用 mkfs 命令进行格式化。例如,如果你的硬盘设备名称是 /dev/sdb,你可以使用以下命令:
sudo mkfs.ext4 /dev/sdb这将删除硬盘上的所有数据,请确保硬盘没有重要数据。
- 备份 /data 目录的内容:在挂载新硬盘之前,建议备份 /data 目录的内容,以防万一。
sudo cp -r /data /data_backup- 挂载新硬盘:现在,你可以将新硬盘挂载到 /data 目录。使用 mount 命令
sudo mount /dev/sdb /data- 恢复 /data 目录的内容:将之前备份的 /data 目录的内容复制回来。
sudo cp -r /data_backup/* /data/- 设置自动挂载:为了在系统重启后自动挂载新硬盘,你需要编辑 /etc/fstab 文件。首先,使用 blkid 命令获取新硬盘的 UUID
sudo blkid然后,使用文本编辑器打开 /etc/fstab 文件。
sudo vim /etc/fstab在文件的末尾添加一行,如下所示(用你的 UUID 替换 YOUR-UUID-HERE):
UUID=YOUR-UUID-HERE /data ext4 defaults 0 2保存并关闭文件。
- 测试配置:为了确认一切正常,你可以尝试重新挂载文件系统
sudo umount /data
sudo mount -a
确保 /data 目录可以正常访问,并且包含之前的内容。
lvm添加硬盘
参考 Linux LVM --- 硬盘扩容-腾讯云开发者社区-腾讯云
root@slave2:~# df -h
Filesystem                         Size  Used Avail Use% Mounted on
udev                                16G     0   16G   0% /dev
tmpfs                              3.2G  5.0M  3.2G   1% /run
/dev/mapper/ubuntu--vg-ubuntu--lv   15G   15G     0 100% /
tmpfs                               16G     0   16G   0% /dev/shm
tmpfs                              5.0M     0  5.0M   0% /run/lock
tmpfs                               16G     0   16G   0% /sys/fs/cgroup
/dev/sda2                          2.0G  108M  1.7G   6% /boot
root@slave2:~# lsblk
NAME MAJ:MIN RM SIZE RO TYPE MOUNTPOINT
loop0 7:0 0 62M 1 loop /snap/core20/1611
loop1 7:1 0 63.5M 1 loop /snap/core20/1974
loop2 7:2 0 53.3M 1 loop /snap/snapd/19457
loop3 7:3 0 91.9M 1 loop /snap/lxd/24061
loop4 7:4 0 67.8M 1 loop /snap/lxd/22753
sda 8:0 0 32G 0 disk
├─sda1 8:1 0 1M 0 part
├─sda2 8:2 0 2G 0 part /boot
└─sda3 8:3 0 30G 0 part
└─ubuntu--vg-ubuntu--lv 253:0 0 15G 0 lvm /
sdb 8:16 0 512G 0 disk
sr0 11:0 1 1.3G 0 romroot@slave2:~# fdisk /dev/sdb
Welcome to fdisk (util-linux 2.34).
Changes will remain in memory only, until you decide to write them.
Be careful before using the write command.
Device does not contain a recognized partition table.
Created a new DOS disklabel with disk identifier 0xf2b406e7.
Command (m for help): n # 添加新分区
Partition type
p primary (0 primary, 0 extended, 4 free)
e extended (container for logical partitions)
Select (default p): p #回车,默认p,主分区
Partition number (1-4, default 1): 1 # 回车, 默认1
First sector (2048-1073741823, default 2048): # 回车,默认起始位置
Last sector, +/-sectors or +/-size{K,M,G,T,P} (2048-1073741823, default 1073741823): # 回车,默认最后位置
Created a new partition 1 of type 'Linux' and of size 512 GiB.
Command (m for help): t # 更改分区格式
Selected partition 1
Hex code (type L to list all codes): L # 查看可选项
0 Empty 24 NEC DOS 81 Minix / old Lin bf Solaris
1 FAT12 27 Hidden NTFS Win 82 Linux swap / So c1 DRDOS/sec (FAT-
2 XENIX root 39 Plan 9 83 Linux c4 DRDOS/sec (FAT-
3 XENIX usr 3c PartitionMagic 84 OS/2 hidden or c6 DRDOS/sec (FAT-
4 FAT16 <32M 40 Venix 80286 85 Linux extended c7 Syrinx
5 Extended 41 PPC PReP Boot 86 NTFS volume set da Non-FS data
6 FAT16 42 SFS 87 NTFS volume set db CP/M / CTOS / .
7 HPFS/NTFS/exFAT 4d QNX4.x 88 Linux plaintext de Dell Utility
8 AIX 4e QNX4.x 2nd part 8e Linux LVM df BootIt
9 AIX bootable 4f QNX4.x 3rd part 93 Amoeba e1 DOS access
a OS/2 Boot Manag 50 OnTrack DM 94 Amoeba BBT e3 DOS R/O
b W95 FAT32 51 OnTrack DM6 Aux 9f BSD/OS e4 SpeedStor
c W95 FAT32 (LBA) 52 CP/M a0 IBM Thinkpad hi ea Rufus alignment
e W95 FAT16 (LBA) 53 OnTrack DM6 Aux a5 FreeBSD eb BeOS fs
f W95 Ext'd (LBA) 54 OnTrackDM6 a6 OpenBSD ee GPT
10 OPUS 55 EZ-Drive a7 NeXTSTEP ef EFI (FAT-12/16/
11 Hidden FAT12 56 Golden Bow a8 Darwin UFS f0 Linux/PA-RISC b
12 Compaq diagnost 5c Priam Edisk a9 NetBSD f1 SpeedStor
14 Hidden FAT16 <3 61 SpeedStor ab Darwin boot f4 SpeedStor
16 Hidden FAT16 63 GNU HURD or Sys af HFS / HFS+ f2 DOS secondary
17 Hidden HPFS/NTF 64 Novell Netware b7 BSDI fs fb VMware VMFS
18 AST SmartSleep 65 Novell Netware b8 BSDI swap fc VMware VMKCORE
1b Hidden W95 FAT3 70 DiskSecure Mult bb Boot Wizard hid fd Linux raid auto
1c Hidden W95 FAT3 75 PC/IX bc Acronis FAT32 L fe LANstep
1e Hidden W95 FAT1 80 Old Minix be Solaris boot ff BBT
Hex code (type L to list all codes): 8e # 更改分区格式为LVM
Changed type of partition 'Linux' to 'Linux LVM'.
Command (m for help): p # 打印,Blocks为分区大小 单位为kb
Disk /dev/sdb: 512 GiB, 549755813888 bytes, 1073741824 sectors
Disk model: QEMU HARDDISK
Units: sectors of 1 * 512 = 512 bytes
Sector size (logical/physical): 512 bytes / 512 bytes
I/O size (minimum/optimal): 512 bytes / 512 bytes
Disklabel type: dos
Disk identifier: 0xf2b406e7
Device Boot Start End Sectors Size Id Type
/dev/sdb1 2048 1073741823 1073739776 512G 8e Linux LVM
Command (m for help): w # 保存
The partition table has been altered.
Calling ioctl() to re-read partition table.
Syncing disks.将物理硬盘格式化成PV(物理卷) 使用的是pvcreate命令
root@slave2:~# pvcreate  /dev/sdb1
  Physical volume "/dev/sdb1" successfully created.
查看当前vg信息
root@slave2:~# vgdisplay
  --- Volume group ---
  VG Name               ubuntu-vg
  System ID
  Format                lvm2
  Metadata Areas        1
  Metadata Sequence No  2
  VG Access             read/write
  VG Status             resizable
  MAX LV                0
  Cur LV                1
  Open LV               1
  Max PV                0
  Cur PV                1
  Act PV                1
  VG Size               <30.00 GiB
  PE Size               4.00 MiB
  Total PE              7679
  Alloc PE / Size       3839 / <15.00 GiB
  Free  PE / Size       3840 / 15.00 GiB
  VG UUID               ukWSKh-0kIi-Gu8z-r41M-Jqav-WVlW-AfDCfd
把转换好的物理卷并到vg(卷组)中, 通过vgcreate命令
root@slave2:~# vgextend ubuntu-vg /dev/sdb1
  Volume group "ubuntu-vg" successfully extended
root@slave2:~# vgdisplay
  --- Volume group ---
  VG Name               ubuntu-vg
  System ID
  Format                lvm2
  Metadata Areas        2
  Metadata Sequence No  3
  VG Access             read/write
  VG Status             resizable
  MAX LV                0
  Cur LV                1
  Open LV               1
  Max PV                0
  Cur PV                2
  Act PV                2
  VG Size               541.99 GiB
  PE Size               4.00 MiB
  Total PE              138750
  Alloc PE / Size       3839 / <15.00 GiB
  Free  PE / Size       134911 / <527.00 GiB
  VG UUID               ukWSKh-0kIi-Gu8z-r41M-Jqav-WVlW-AfDCfd
查看逻辑卷,选择对应逻辑卷路径
root@slave2:~# lvdisplay
  --- Logical volume ---
  LV Path                /dev/ubuntu-vg/ubuntu-lv
  LV Name                ubuntu-lv
  VG Name                ubuntu-vg
  LV UUID                qAiYhj-Zwp7-jxoc-dlN5-fni7-E0Sj-iOFN3j
  LV Write Access        read/write
  LV Creation host, time ubuntu-server, 2023-07-13 10:20:53 +0800
  LV Status              available
  # open                 1
  LV Size                <15.00 GiB
  Current LE             3839
  Segments               1
  Allocation             inherit
  Read ahead sectors     auto
  - currently set to     256
  Block device           253:0
扩容当前逻辑卷空间
root@slave2:~# lvextend /dev/ubuntu-vg/ubuntu-lv /dev/sdb1
  Size of logical volume ubuntu-vg/ubuntu-lv changed from <15.00 GiB (3839 extents) to 526.99 GiB (134910 extents).
  Logical volume ubuntu-vg/ubuntu-lv successfully resized.
写入文件系统,使扩容生效
root@slave2:~# xfs_growfs /dev/mapper/ubuntu--vg-ubuntu--lv
xfs_growfs: /dev/mapper/ubuntu--vg-ubuntu--lv is not a mounted XFS filesystem # 报错了
# 使用ext文件系统,可以使用resize2fs命令替换xfs_growfs命令
root@slave2:~# resize2fs /dev/mapper/ubuntu--vg-ubuntu--lv
resize2fs 1.45.5 (07-Jan-2020)
Filesystem at /dev/mapper/ubuntu--vg-ubuntu--lv is mounted on /; on-line resizing required
old_desc_blocks = 2, new_desc_blocks = 66
The filesystem on /dev/mapper/ubuntu--vg-ubuntu--lv is now 138147840 (4k) blocks long.
查看扩容后的物理卷
root@slave2:~# pvs
  PV         VG        Fmt  Attr PSize    PFree
  /dev/sda3  ubuntu-vg lvm2 a--   <30.00g 15.00g
  /dev/sdb1  ubuntu-vg lvm2 a--  <512.00g     0
查看根分区扩容效果
root@slave2:~# df -hT
Filesystem                        Type      Size  Used Avail Use% Mounted on
udev                              devtmpfs   16G     0   16G   0% /dev
tmpfs                             tmpfs     3.2G  5.1M  3.2G   1% /run
/dev/mapper/ubuntu--vg-ubuntu--lv ext4      519G   15G  483G   3% /
tmpfs                             tmpfs      16G     0   16G   0% /dev/shm
tmpfs                             tmpfs     5.0M     0  5.0M   0% /run/lock
tmpfs                             tmpfs      16G     0   16G   0% /sys/fs/cgroup
/dev/sda2                         ext4      2.0G  108M  1.7G   6% /boot
清理内存
#手动清理内存前,先执行sync命令,将内存中的脏页,写进磁盘,以免数据丢失。
sync

echo 1 > /proc/sys/vm/drop_caches

#清除后要还原系统默认配置:
echo 0 > /proc/sys/vm/drop_caches

#查看设置
 sysctl -a | grep drop_caches
相关信息
清理cache、dentries和inodes echo 3 >/proc/sys/vm/drop_caches 只清理dentries和inodes echo 2 >/proc/sys/vm/drop_caches 只清理cache echo 1 >/proc/sys/vm/drop_caches
安装Docker
- 更新apt软件包索引
sudo apt update- 安装必要的软件包以允许apt使用HTTPS
sudo apt install apt-transport-https ca-certificates curl software-properties-common可能出现的问题
相关信息
下列软件包有未满足的依赖关系: curl : 依赖: libcurl4 (=7.58.0-2ubuntu3.10) 但是 7.68.0-1ubuntu2.1 正要被安装 E: 无法修正错误,因为您要求某些软件包保持现状,就是它们破坏了软件包间的依赖关系
apt-get purge libcurl4

apt-get install curl
# 然后再执行上面的命令- 添加Docker的官方GPG密钥
curl -fsSL https://download.docker.com/linux/ubuntu/gpg | sudo gpg --dearmor -o /usr/share/keyrings/docker-archive-keyring.gpg
curl -fsSL https://mirrors.tuna.tsinghua.edu.cn/docker-ce/linux/ubuntu/gpg | sudo gpg --dearmor -o /usr/share/keyrings/docker-archive-keyring.gpg- 设置Docker稳定版存储库
echo "deb [arch=amd64 signed-by=/usr/share/keyrings/docker-archive-keyring.gpg] https://download.docker.com/linux/ubuntu $(lsb_release -cs) stable" | sudo tee /etc/apt/sources.list.d/docker.list > /dev/null

echo "deb [arch=$(dpkg --print-architecture) signed-by=/usr/share/keyrings/docker-archive-keyring.gpg] https://mirrors.tuna.tsinghua.edu.cn/docker-ce/linux/ubuntu/ $(lsb_release -cs) stable" | sudo tee /etc/apt/sources.list.d/docker.list > /dev/null- 更新apt软件包索引(必须)
sudo apt update- 安装Docker Engine
sudo apt install docker-ce docker-ce-cli containerd.io
docker --version # 查看版本
备用方案
docker-ce | 镜像站使用帮助 | 清华大学开源软件镜像站 | Tsinghua Open Source Mirror

配置阿里云镜像加速
进入阿里云官网,搜索容器镜像服务https://cr.console.aliyun.com/cn-hangzhou/instances/mirrors 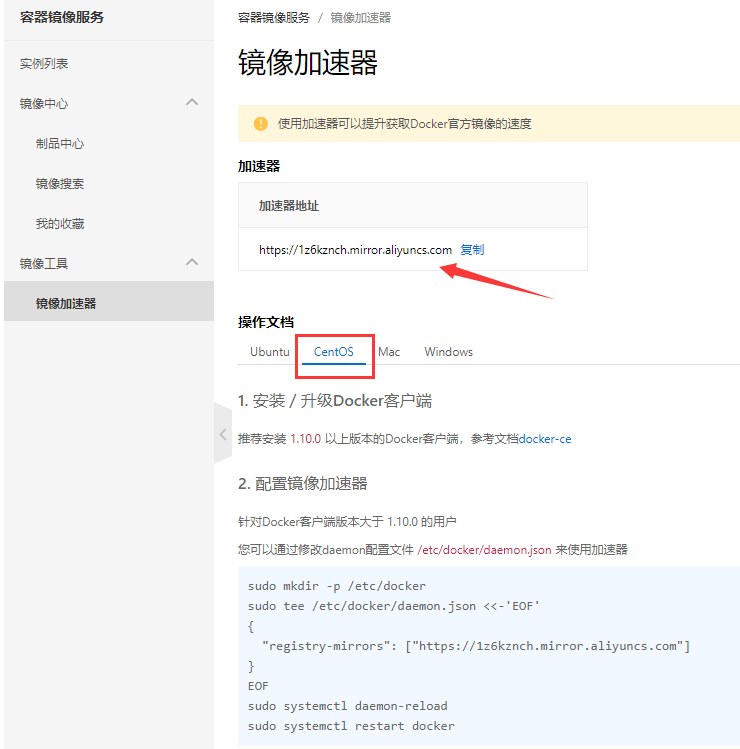
sudo mkdir -p /etc/docker

sudo tee /etc/docker/daemon.json <<-'EOF'
{
  "registry-mirrors": ["https://1z6kznch.mirror.aliyuncs.com"]
}
EOF

sudo systemctl daemon-reload

sudo systemctl restart docker 百度docker加速:https://mirror.baidubce.com (因为中途碰到了,阿里云的加速失效)
安装Go
更新
apt update下载二进制包
wget https://go.dev/dl/go1.19.5.linux-amd64.tar.gz解压文件并将其移至 /usr/local 目录
tar -C /usr/local/ -xzf go1.19.5.linux-amd64.tar.gz查看 /usr/local/go 目录的内容
ls /usr/local/go

api  bin  codereview.cfg  CONTRIBUTING.md  doc  lib  LICENSE  misc  PATENTS  pkg  README.md  SECURITY.md  src  test  VERSION
修改环境变量
vim ~/.bash_profile粘贴如下行
export PATH=$PATH:/usr/local/go/bin
export GOROOT=/usr/local/go/src
export GOPATH=/data/go
重新加载
source ~/.bash_profile