profile详解
1、profile 概述
①单词释义
 这里我们可以对接 profile 这个单词中『侧面』这个含义:项目的每一个运行环境,相当于是项目整体的一个侧面。
②项目的不同运行环境
 通常情况下,我们至少有三种运行环境:
- 开发环境:供不同开发工程师开发的各个模块之间互相调用、访问;内部使用
- 测试环境:供测试工程师对项目的各个模块进行功能测试;内部使用
- 生产环境:供最终用户访问——所以这是正式的运行环境,对外提供服务
而我们这里的『环境』仍然只是一个笼统的说法,实际工作中一整套运行环境会包含很多种不同服务器:
- MySQL
- Redis
- ElasticSearch
- RabbitMQ
- FastDFS
- Nginx
- Tomcat
- ……
就拿其中的 MySQL 来说,不同环境下的访问参数肯定完全不同:
| 开发环境 | 测试环境 | 生产环境 |
|---|---|---|
| dev.driver=com.mysql.jdbc.Driver | ||
| dev.url=jdbc:mysql://124.71.36.17:3306/db-sys | ||
| dev.username=root | ||
| dev.password=atguigu | test.driver=com.mysql.jdbc.Driver | |
| test.url=jdbc:mysql://124.71.36.89:3306/db-sys | ||
| test.username=dev-team | ||
| test.password=atguigu | product.driver=com.mysql.jdbc.Driver | |
| product.url=jdbc:mysql://39.107.88.164:3306/prod-db-sys | ||
| product.username=root | ||
| product.password=atguigu |
可是代码只有一套。如果在 jdbc.properties 里面来回改,那就太麻烦了,而且很容易遗漏或写错,增加调试的难度和工作量。所以最好的办法就是把适用于各种不同环境的配置信息分别准备好,部署哪个环境就激活哪个配置。 在 Maven 中,使用 profile 机制来管理不同环境下的配置信息。但是解决同类问题的类似机制在其他框架中也有,而且从模块划分的角度来说,持久化层的信息放在构建工具中配置也违反了『高内聚,低耦合』的原则。 所以 Maven 的 profile 我们了解一下即可,不必深究。
③profile 声明和使用的基本逻辑
- 首先为每一个环境声明一个 profile
- 环境 A:profile A
- 环境 B:profile B
- 环境 C:profile C
- ……
- 然后激活某一个 profile
④默认 profile
其实即使我们在 pom.xml 中不配置 profile 标签,也已经用到 profile了。为什么呢?因为根标签 project 下所有标签相当于都是在设定默认的 profile。这样一来我们也就很容易理解下面这句话:project 标签下除了 modelVersion 和坐标标签之外,其它标签都可以配置到 profile 中。
2、profile 配置
①外部视角:配置文件
从外部视角来看,profile 可以在下面两种配置文件中配置:
- settings.xml:全局生效。其中我们最熟悉的就是配置 JDK 1.8。
- pom.xml:当前 POM 生效
②内部实现:具体标签
从内部视角来看,配置 profile 有如下语法要求:
[1] profiles/profile 标签
- 由于 profile 天然代表众多可选配置中的一个所以由复数形式的 profiles 标签统一管理。
- 由于 profile 标签覆盖了 pom.xml 中的默认配置,所以 profiles 标签通常是 pom.xml 中的最后一个标签。
[2]id 标签
每个 profile 都必须有一个 id 标签,指定该 profile 的唯一标识。这个 id 标签的值会在命令行调用 profile 时被用到。这个命令格式是:-D<profile id>。
[3]其它允许出现的标签
一个 profile 可以覆盖项目的最终名称、项目依赖、插件配置等各个方面以影响构建行为。
- build
- defaultGoal
- finalName
- resources
- testResources
- plugins
- reporting
- modules
- dependencies
- dependencyManagement
- repositories
- pluginRepositories
- properties
3、激活 profile
①默认配置默认被激活
前面提到了,POM 中没有在 profile 标签里的就是默认的 profile,当然默认被激活。
②基于环境信息激活
环境信息包含:JDK 版本、操作系统参数、文件、属性等各个方面。一个 profile 一旦被激活,那么它定义的所有配置都会覆盖原来 POM 中对应层次的元素。大家可以参考下面的标签结构:
<profile>
	<id>dev</id>
    <activation>
        <!-- 配置是否默认激活 -->
    	<activeByDefault>false</activeByDefault>
        <jdk>1.5</jdk>
        <os>
        	<name>Windows XP</name>
            <family>Windows</family>
            <arch>x86</arch>
            <version>5.1.2600</version>
        </os>
        <property>
        	<name>mavenVersion</name>
            <value>2.0.5</value>
        </property>
        <file>
        	<exists>file2.properties</exists>
            <missing>file1.properties</missing>
        </file>
    </activation>
</profile>
这里有个问题是:多个激活条件之间是什么关系呢?
- Maven 3.2.2 之前:遇到第一个满足的条件即可激活——或的关系。
- Maven 3.2.2 开始:各条件均需满足——且的关系。
下面我们来看一个具体例子。假设有如下 profile 配置,在 JDK 版本为 1.6 时被激活:
<profiles>
	<profile>
    	<id>JDK1.6</id>
        <activation>
            <!-- 指定激活条件为:JDK 1.6 -->
        	<jdk>1.6</jdk>
        </activation>
        ……
    </profile>
</profiles>
这里需要指出的是:Maven 会自动检测当前环境安装的 JDK 版本,只要 JDK 版本是以 1.6 开头都算符合条件。下面几个例子都符合:
- 1.6.0_03
- 1.6.0_02
- ……
③命令行激活
[1]列出活动的 profile
# 列出所有激活的 profile,以及它们在哪里定义
mvn help:active-profiles
[2]指定某个具体 profile
mvn compile -P<profile id>4、操作举例
①编写 Lambda 表达式代码
Lambda 表达式代码要求 JDK 版本必须是 1.8,我们可以以此来判断某个指定更低 JDK 版本的 profile 是否被激活生效。
@Test
public void test() {
    new Thread(()->{
        System.out.println(Thread.currentThread().getName() + " is working");
    }).start();
}
以目前配置运行这个测试方法: 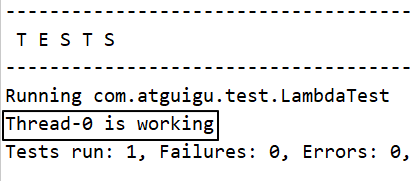
②配置 profile
<profiles>
    <profile>
        <id>myJDKProfile</id>
        <!-- build 标签:意思是告诉 Maven,你的构建行为,我要开始定制了! -->
        <build>
            <!-- plugins 标签:Maven 你给我听好了,你给我构建的时候要用到这些插件! -->
            <plugins>
                <!-- plugin 标签:这是我要指定的一个具体的插件 -->
                <plugin>
                    <!-- 插件的坐标。此处引用的 maven-compiler-plugin 插件不是第三方的,是一个 Maven 自带的插件。 -->
                    <groupId>org.apache.maven.plugins</groupId>
                    <artifactId>maven-compiler-plugin</artifactId>
                    <version>3.1</version>

                    <!-- configuration 标签:配置 maven-compiler-plugin 插件 -->
                    <configuration>
                        <!-- 具体配置信息会因为插件不同、需求不同而有所差异 -->
                        <source>1.6</source>
                        <target>1.6</target>
                        <encoding>UTF-8</encoding>
                    </configuration>
                </plugin>
            </plugins>
        </build>
    </profile>
</profiles>
③执行构建命令
mvn clean test -PmyJDKProfile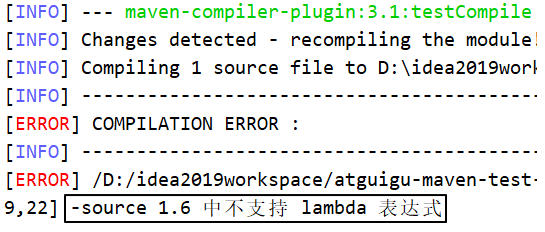
5、资源属性过滤
①简介
Maven 为了能够通过 profile 实现各不同运行环境切换,提供了一种『资源属性过滤』的机制。通过属性替换实现不同环境使用不同的参数。
②操作演示
[1]配置 profile
<profiles>
    <profile>
        <id>devJDBCProfile</id>
        <properties>
            <dev.jdbc.user>root</dev.jdbc.user>
            <dev.jdbc.password>atguigu</dev.jdbc.password>
            <dev.jdbc.url>http://localhost:3306/db_good</dev.jdbc.url>
            <dev.jdbc.driver>com.mysql.jdbc.Driver</dev.jdbc.driver>
        </properties>
        <build>
            <resources>
                <resource>
                    <!-- 表示为这里指定的目录开启资源过滤功能 -->
                    <directory>src/main/resources</directory>

                    <!-- 将资源过滤功能打开 -->
                    <filtering>true</filtering>
                </resource>
            </resources>
        </build>
    </profile>
</profiles>
[2]创建待处理的资源文件
dev.user=${dev.jdbc.user}
dev.password=${dev.jdbc.password}
dev.url=${dev.jdbc.url}
dev.driver=${dev.jdbc.driver}
[3]执行处理资源命令
mvn clean resources:resources -PdevJDBCProfile[4]找到处理得到的资源文件

[5]延伸
我们时不时会在 resource 标签下看到 includes 和 excludes 标签。它们的作用是:
- includes:指定执行 resource 阶段时要包含到目标位置的资源
- excludes:指定执行 resource 阶段时要排除的资源
情看下面的例子:
<build>
    <resources>
        <resource>
            <!-- 表示为这里指定的目录开启资源过滤功能 -->
            <directory>src/main/resources</directory>

            <!-- 将资源过滤功能打开 -->
            <filtering>true</filtering>

            <includes>
                <include>*.properties</include>
            </includes>

            <excludes>
                <exclude>happy.properties</exclude>
            </excludes>
        </resource>
    </resources>
</build>
执行处理资源命令:
mvn clean resources:resources -PdevJDBCProfile执行效果如下:  当然我们这里只是以 properties 文件为例,并不是只能处理 properties 文件。